Eliminate Video Noise: Genesis Model 2 RGB Bypass Mod
Advertisements
Eliminating video noise on a Sega Genesis Model 2 VA4 motherboard is achievable through a precise 3-step RGB bypass modification, significantly enhancing picture quality for an optimal retro gaming experience.
Are you tired of grainy, noisy video output from your classic Sega Genesis Model 2? For many retro gaming enthusiasts, the quest for a pristine visual experience often leads to hardware modifications. This guide will walk you through how to eliminate video noise: the 3-step RGB bypass mod for Genesis Model 2 VA4 motherboards, ensuring your beloved console delivers the crisp, vibrant images it was always meant to.
Understanding Video Noise in Retro Consoles
Video noise is a common frustration for owners of vintage gaming consoles, manifesting as visual artifacts, lines, or general interference on the screen. This phenomenon is particularly prevalent in older systems like the Sega Genesis, where original video output circuits were not designed for the high-fidelity displays we use today. The Genesis Model 2, especially its VA4 revision, can suffer from noticeable noise in its RGB output, detracting from the otherwise rich color palette of its games.
The root cause often lies in the console's internal video encoder chip and the path the video signal takes before reaching the output. Electromagnetic interference (EMI) from other components within the console, coupled with aging capacitors and suboptimal trace routing on the motherboard, can introduce unwanted signals into the video stream. This results in a picture that lacks clarity and exhibits a distracting 'jailbar' effect or other forms of interference that diminish the retro gaming experience.
The Genesis Model 2 VA4 Specifics
The Sega Genesis Model 2 underwent several revisions, and the VA4 motherboard is a specific iteration known for certain characteristics, including its video output. While it offers RGB output, the internal routing and components can introduce noise. Identifying your console's motherboard revision is crucial before attempting any modifications, as the bypass points and methods can vary. The VA4 is a prime candidate for an RGB bypass mod due to its common noise issues, making it a popular target for enthusiasts seeking to clean up its video.
- Common Noise Sources: Internal EMI, aging components, suboptimal trace routing.
- VA4 Motherboard: Specific revision often targeted for RGB bypass due to video noise.
- Impact on Gaming: Distracting visual artifacts like 'jailbars' or fuzzy images.

Ultimately, understanding the origins of video noise is the first step toward rectifying it. The RGB bypass mod directly addresses these issues by creating a cleaner, more direct path for the video signal, circumventing the noisy internal encoder and delivering a superior image to your display. This foundational knowledge empowers modders to appreciate the technical improvements achieved with the bypass.
Gathering Your Tools and Components
Before embarking on any hardware modification, meticulous preparation is key. The success of the Genesis RGB bypass mod hinges on having the right tools and components at your disposal. Attempting this mod without the proper equipment can lead to frustration, damage to your console, or a less-than-optimal outcome. Investing in quality tools will not only make the process smoother but also ensure the longevity and reliability of your modification.
You'll need a precise soldering iron with a fine tip, suitable for delicate work on a circuit board. Solder wick and a desoldering pump are indispensable for correcting mistakes and removing old solder. A multimeter will be useful for continuity checks, and small precision screwdrivers are necessary to open the console. Beyond tools, the specific electronic components are critical. These typically include an RGB amplifier circuit (often a small PCB), thin gauge wire, and sometimes new capacitors or resistors depending on the specific bypass kit or method you choose.
Essential Tools for the Mod
Having the correct tools on hand before you begin will significantly streamline the modification process and reduce the risk of errors. A well-organized workspace also contributes to a successful mod. Ensure your soldering iron is properly tinned and that you have adequate lighting.
- Soldering Iron: A temperature-controlled iron with a fine tip (e.g., 0.8mm or smaller).
- Desoldering Tools: Solder wick and a desoldering pump for cleanup and error correction.
- Precision Screwdrivers: Phillips head for console disassembly.
- Multimeter: For checking continuity and voltage, if troubleshooting is required.
- Magnification: A magnifying lamp or jeweler's loupe for inspecting solder joints.
The quality of your components also plays a significant role. Opt for reputable suppliers for your RGB amplifier board and other electronic parts. Cheap, low-quality components can introduce new problems or simply fail to deliver the desired improvement in video quality. Always double-check that you have all necessary items before starting to avoid interruptions.
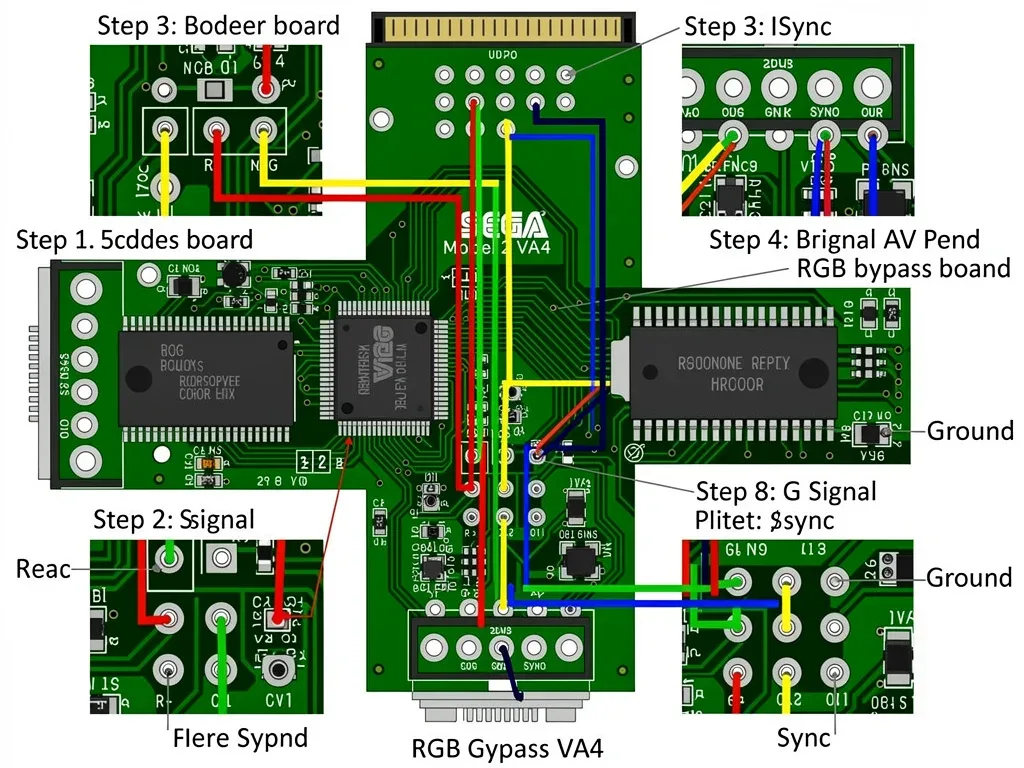
Step 1: Preparing the Motherboard for Bypass
The first crucial step in the Genesis RGB bypass mod involves carefully preparing your console's motherboard. This phase requires patience and precision, as improper handling can lead to irreversible damage. Begin by safely disassembling your Sega Genesis Model 2, ensuring you keep track of all screws and components. Once the motherboard is exposed, you'll need to locate the specific video encoder chip and the points where the original RGB lines run.
For the VA4 motherboard, the video encoder chip is typically a CXA1645 or a similar model. The goal here is to intercept the raw RGB signals directly from the VDP (Video Display Processor) before they enter the noisy encoder. This involves desoldering the original RGB output pins from the encoder or carefully cutting the traces that lead into it. This ensures that the new, bypassed signal is truly isolated from the console's inherent noise.
Locating Key Solder Points
Identifying the correct solder points is paramount. Referencing a reliable schematic or a detailed visual guide for the Genesis Model 2 VA4 is highly recommended. These points are usually very small and require a steady hand and good eyesight. Once identified, you'll need to carefully clean these areas, removing any old solder or flux residue to ensure a strong, clean connection for your bypass wires.
- Disassembly: Carefully open the console and remove the motherboard.
- Identify Encoder: Locate the CXA1645 (or equivalent) video encoder chip.
- Isolate RGB Traces: Desolder or cut the traces leading from the VDP to the encoder for Red, Green, and Blue signals.
- Cleanliness: Ensure all solder pads are clean and free of debris for optimal connections.
Preparation also includes tinning your wires and the solder pads. Tinning involves applying a thin layer of solder to both the wire ends and the pads, which helps create a much stronger and more reliable solder joint. Taking your time during this preparatory step will prevent many common issues and set you up for success in the subsequent stages of the mod.
Step 2: Installing the RGB Amplifier Board
With the motherboard prepared and the original RGB lines isolated, the next step in the Genesis RGB bypass mod is to install the dedicated RGB amplifier board. This small circuit board is the heart of the bypass, designed to take the raw, clean RGB signals directly from the VDP, amplify them to the correct levels, and output them with minimal interference. The amplifier board effectively replaces the console's original, noisy video encoder.
The installation process involves carefully soldering thin gauge wires from the previously identified raw RGB output points on the VDP to the corresponding input pads on your RGB amplifier board. Additionally, you'll need to supply power (VCC) and ground (GND) to the amplifier board from suitable points on the motherboard. These power connections are vital for the amplifier's operation and must be stable and clean to avoid introducing new forms of noise.
Connecting the Amplifier Board
Making precise and secure solder connections is critical here. Use minimal solder to avoid bridging connections, and ensure each wire is securely attached. Double-check your connections against the amplifier board's documentation or a reliable guide to prevent miswiring. Incorrect wiring can lead to a non-functional video output or even damage to the components.
- Solder RGB Wires: Connect raw RGB signals from VDP to amplifier input pads.
- Power Connections: Solder VCC and GND from the motherboard to the amplifier board.
- Verify Orientation: Ensure the amplifier board is mounted correctly, avoiding shorts.
- Secure Placement: Use Kapton tape or hot glue to secure the amplifier board to prevent movement.
Once all the input and power connections are made, it's a good practice to perform a continuity check with your multimeter to ensure there are no shorts or open circuits. Properly securing the amplifier board within the console, usually with Kapton tape or a small dab of hot glue, is also important to prevent it from moving around and potentially causing damage or short circuits during reassembly. This step significantly contributes to the overall stability and performance of the bypass.
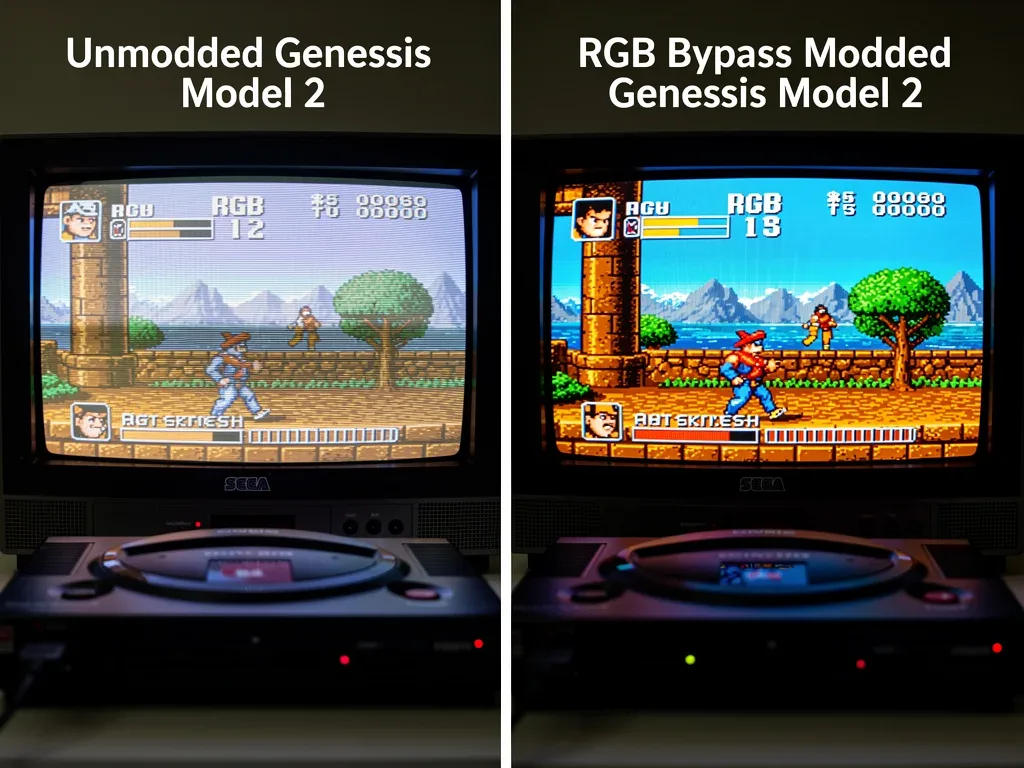
Step 3: Routing and Testing the New RGB Output
The final step in the Genesis RGB bypass mod involves routing the newly amplified RGB signals to the console's output port and thoroughly testing the results. After the RGB amplifier board is securely installed and wired, you'll need to connect its output pads to the appropriate pins on the console's multi-out port. This effectively reroutes the clean, amplified video signal directly to your display device, bypassing the console's original, noisy video output circuitry.
Carefully solder wires from the amplifier's RGB, sync, and ground output pads to the corresponding pins on the multi-out connector. It’s crucial to use a high-quality cable for your RGB output, such as a shielded SCART or component cable, to ensure the pristine signal isn't degraded before it reaches your television or monitor. Poor quality cables can reintroduce noise or signal loss, negating the benefits of the bypass mod.
Post-Installation Testing and Troubleshooting
Once all connections are made, it's time for the moment of truth: testing. Reassemble your Genesis Model 2 (partially, if you want to make adjustments easily), connect it to your display, and power it on. Observe the video output carefully for any signs of noise, incorrect colors, or other anomalies. If issues arise, systematically troubleshoot your connections, checking for cold solder joints, bridged connections, or miswired pins.
- Connect Outputs: Solder amplifier output to multi-out pins (RGB, Sync, GND).
- Cable Quality: Use a high-quality, shielded RGB cable for optimal signal transfer.
- Initial Power-Up: Test the console with a game to check video output.
- Troubleshooting: Inspect all solder joints and wiring if issues are present.
Don't be discouraged if the video isn't perfect on the first try. Modding often involves a bit of trial and error. Common issues include incorrect sync wiring, which can cause rolling images, or poor ground connections, leading to hum or color shifts. With patience and careful inspection, you can resolve most problems. A successful test will reveal a noticeably clearer, more vibrant image, free from the video noise that plagued your unmodded console.
Optimizing Your Retro Gaming Setup
Successfully completing the Genesis RGB bypass mod is a significant achievement, but it's just one piece of the puzzle for an optimal retro gaming setup. To truly appreciate the benefits of your newly modded console, you need to consider the entire signal chain. A high-quality display, appropriate cables, and even audio modifications can further enhance your experience, bringing your classic games to life in ways you might not have thought possible.
Connecting your modded Genesis to a display that can properly handle RGB signals is paramount. CRT televisions, especially those with SCART inputs, are often considered the gold standard for retro gaming due to their native handling of analog signals and lack of input lag. However, modern flat-panel displays can also provide excellent results when paired with a high-quality upscaler that processes the RGB signal correctly. The choice of display significantly impacts the perceived video quality.
Beyond the Bypass: Further Enhancements
While the RGB bypass addresses video noise, other modifications can elevate your gaming experience. Audio mods, such as an audio bypass, can clean up the sound output, eliminating hum or distortion. Flash carts allow you to play a vast library of games without constantly swapping cartridges, and controller modifications can improve responsiveness and comfort. Each enhancement contributes to a more immersive and enjoyable retro gaming session.
- Display Choice: Pair with a CRT or a modern display with a quality upscaler.
- High-Quality Cables: Use shielded SCART, component, or HDMI (via upscaler) cables.
- Audio Mods: Consider an audio bypass for cleaner sound output.
- Flash Carts: Expand your game library and convenience.
Ultimately, optimizing your retro gaming setup is a personal journey. The RGB bypass is a foundational step towards achieving superior video quality, but exploring other modifications and peripherals can further tailor your experience to your preferences. The goal is to preserve the authenticity of classic games while mitigating the technical limitations of aging hardware, allowing you to fully immerse yourself in the nostalgia and fun of retro gaming.
Common Pitfalls and Troubleshooting Tips
Even with careful planning and execution, hardware modifications like the Genesis RGB bypass can present unforeseen challenges. Encountering issues during or after the mod is not uncommon, and knowing how to troubleshoot effectively can save you a lot of time and frustration. Identifying common pitfalls and having a systematic approach to problem-solving will ensure you can rectify any issues and successfully achieve a clean video output.
One of the most frequent problems is a lack of video signal or an incorrect display. This often points to a miswired connection, either at the VDP, the amplifier board, or the multi-out port. Cold solder joints, where the solder hasn't properly bonded with the component or pad, are another common culprit. These can create intermittent connections or complete signal loss. Always inspect your solder joints under magnification for dull, bumpy, or cracked appearances, which indicate a poor connection.
Addressing Specific Issues
If you experience issues such as color distortion, vertical lines, or a rolling image, these often indicate specific wiring problems. Color distortion might suggest an issue with one of the RGB lines, while vertical lines (often referred to as 'jailbars') could mean the bypass isn't fully isolating the signal or there's residual noise. A rolling image typically points to an incorrectly wired or missing sync signal. A multimeter is invaluable for checking continuity and ensuring power is reaching the amplifier board.
- No Video/Incorrect Display: Check all RGB, sync, and ground connections for miswiring or cold joints.
- Color Issues: Verify individual RGB line connections from VDP to amplifier and amplifier to multi-out.
- Vertical Lines ('Jailbars'): Ensure proper isolation from the original encoder and clean power supply to the amplifier.
- Rolling Image: Confirm correct sync signal wiring and integrity.
Before reassembling the console completely, it's wise to perform preliminary tests after each significant connection is made. This allows you to isolate problems to specific stages of the mod. If all else fails, don't hesitate to consult online communities and forums dedicated to retro console modding. Many experienced modders are willing to offer advice and share their troubleshooting insights, helping you overcome any obstacles you encounter.
The Enduring Appeal of Modded Retro Consoles
The journey to eliminate video noise: the 3-step RGB bypass mod for Genesis Model 2 VA4 motherboards is more than just a technical endeavor; it's a testament to the enduring appeal of retro gaming and the dedication of its community. In an era dominated by high-definition graphics and virtual reality, there's a unique charm in revisiting the pixelated worlds of yesteryear. However, to truly appreciate these classics, many enthusiasts seek to enhance their original hardware, making it compatible with modern expectations without sacrificing authenticity.
Modding retro consoles allows players to experience games as they were truly intended, or often, even better than originally presented on consumer-grade equipment. The Genesis RGB bypass mod, for instance, unlocks a level of visual fidelity that was often obscured by the limitations of composite or RF connections. This pursuit of perfection is what drives the retro gaming community, constantly pushing the boundaries of what's possible with vintage hardware. It's a blend of nostalgia, technical skill, and a deep appreciation for gaming history.
Preserving Gaming History
Beyond personal enjoyment, these modifications play a crucial role in preserving gaming history. By making older consoles compatible with contemporary displays and improving their output, we ensure that future generations can experience these seminal titles with clarity and fidelity. It's an act of digital archaeology, breathing new life into aging electronics and keeping the legacy of classic gaming alive. The knowledge shared within the modding community ensures these skills and techniques are passed down.
- Enhanced Experience: Unlocks superior visual fidelity for classic games.
- Community Driven: Fueled by passion for retro gaming and technical skill.
- Historical Preservation: Ensures classic consoles remain playable and enjoyable.
- Future-Proofing: Adapts vintage hardware for modern display technologies.
Ultimately, the satisfaction derived from a successful mod, like the RGB bypass, extends beyond merely having a clearer picture. It's about the connection to a past era of gaming, the challenge of technical mastery, and the joy of seeing beloved games shine in their best possible light. This enduring appeal ensures that the world of retro console modding will continue to thrive, constantly innovating and refining the way we interact with our gaming heritage.
| Key Point | Brief Description |
|---|---|
| Video Noise Origin | Caused by internal EMI and suboptimal video encoder on Genesis Model 2 VA4. |
| 3-Step Mod Overview | Prepare motherboard, install RGB amp, route and test new output for clean video. |
| Tools & Components | Requires soldering iron, desoldering tools, precision screwdrivers, RGB amplifier. |
| Troubleshooting | Systematically check connections, solder joints, and power for common issues. |
Frequently Asked Questions About the RGB Bypass Mod
What is the primary benefit of the RGB bypass mod for Genesis Model 2 VA4 motherboards?▼The main benefit is the elimination of video noise, such as "jailbars" and fuzzy images, providing a significantly cleaner and more vibrant picture quality. This bypass mod directly routes the raw RGB signal, bypassing the noisy original video encoder and enhancing the overall visual experience for retro gamers.
Is the RGB bypass mod difficult to perform for a beginner?▼While not overly complex, the RGB bypass mod requires precise soldering skills and familiarity with working on delicate electronics. Beginners should practice soldering on scrap boards first. Following detailed guides and using appropriate tools can make the process manageable, but caution and patience are essential to avoid damaging the console.
What specific tools and components are essential for this mod?▼You will need a temperature-controlled soldering iron with a fine tip, solder wick, a desoldering pump, precision screwdrivers, and a multimeter. Essential components include an RGB amplifier board, thin gauge wire, and possibly new capacitors or resistors depending on the specific kit or method chosen for the bypass.
Can this mod damage my Sega Genesis Model 2 if done incorrectly?▼Yes, incorrect soldering, miswiring, or static discharge can potentially damage your console's motherboard or components. It is crucial to follow instructions carefully, use proper ESD (Electrostatic Discharge) precautions, and double-check all connections before applying power to minimize risks. Professional installation is an option if unsure.
Will this mod work on all Sega Genesis Model 2 motherboards?▼This guide specifically focuses on the VA4 revision of the Genesis Model 2 motherboard, which is known for its video noise issues. While similar RGB bypass mods exist for other revisions, the exact solder points and methods may vary. Always verify your console's motherboard revision and consult specific guides for that version before proceeding.
Conclusion
The 3-step RGB bypass mod for Genesis Model 2 VA4 motherboards is a transformative upgrade for any retro gaming enthusiast seeking to revitalize their classic console's video output. By meticulously following the steps of preparing the motherboard, installing a dedicated RGB amplifier, and carefully routing the new output, you can effectively eliminate persistent video noise and unlock the vibrant, clear visuals that the Sega Genesis was capable of. This modification not only enhances your personal gaming experience but also contributes to the ongoing effort of preserving gaming history by adapting vintage hardware for modern display standards. While requiring precision and patience, the reward of a pristine image makes this mod an invaluable endeavor for anyone passionate about classic games.