N64 Save Battery Replacement: CR2032 Holders for 5 Classics
Advertisements
Replacing dead save batteries in Nintendo 64 cartridges with CR2032 coin holders is a crucial mod for preserving game progress, involving desoldering the old battery and carefully soldering a new holder for easy future swaps.
For many retro gaming enthusiasts, the Nintendo 64 holds a special place, but nothing is more disheartening than losing precious save data. This comprehensive guide on N64 save battery replacement will walk you through the process of installing CR2032 coin holders on five classic N64 titles, ensuring your progress is never lost again.
Understanding N64 Save Data and Battery Degradation
The Nintendo 64 utilized various methods for saving game progress, with battery-backed SRAM being a common one for many iconic titles. Over time, these small, soldered-in batteries inevitably die, leading to the dreaded "save data corrupted" message or the inability to save at all. Understanding why this happens is the first step toward a permanent solution.
Most N64 cartridges that use battery-backed saves rely on a 3V lithium coin cell, typically a CR2032 or similar variant, directly soldered onto the game's printed circuit board (PCB). These batteries provide a constant, low-power current to maintain the volatile SRAM (Static Random-Access Memory) chip, which holds your save files. When the battery's voltage drops below a critical threshold, the SRAM loses power, and all stored data vanishes. This isn't a flaw in design but a natural consequence of battery chemistry; all batteries have a finite lifespan, usually 10-20 years for these types.
Why CR2032 Coin Holders Are the Superior Solution
While simply replacing the old battery with a new, soldered one is an option, it's a temporary fix that requires desoldering and resoldering every decade or so. Installing a CR2032 coin holder transforms this into a tool-less, five-second swap for future battery changes. This modification not only extends the life of your saves indefinitely but also makes maintenance incredibly easy for the average user.
- Ease of Future Replacement: No soldering required for subsequent battery changes.
- Standardized Battery: CR2032 batteries are widely available and inexpensive.
- Reduced Board Stress: Less frequent soldering means less heat stress on the delicate PCB.
- Long-Term Preservation: Ensures your game saves can be maintained for decades to come.
By opting for a holder, you're not just fixing a problem; you're upgrading your cartridge for longevity and convenience. This approach is highly recommended for any N64 game that uses battery saves, offering peace of mind to collectors and players alike. It's a proactive measure that prevents future heartbreak and keeps your retro gaming experience smooth and uninterrupted.
Essential Tools and Materials for the Job
Before diving into the intricate process of N64 save battery replacement, gathering the correct tools and materials is paramount. Having everything at hand ensures a smooth workflow and minimizes potential damage to your valuable cartridges. This isn't a task to rush, so take the time to prepare your workspace and equipment.
The right tools make all the difference, especially when dealing with delicate electronics. A well-lit, clean workspace is also crucial to prevent losing small components and to ensure precise soldering. Safety should always be a priority; consider wearing safety glasses to protect your eyes from solder splatter or fumes.
Required Tools
- 3.8mm Security Bit: Essential for opening Nintendo 64 game cartridges. Standard screwdrivers will not work.
- Soldering Iron: A temperature-controlled iron is ideal (280-350°C / 536-662°F) to prevent overheating components.
- Desoldering Pump or Braid: For removing old solder from the battery terminals. A pump is generally more effective for larger pads.
- Fine-Tip Tweezers: Useful for handling small components and positioning the battery holder.
- Flush Cutters: For trimming excess lead from the battery holder after soldering.
- Isopropyl Alcohol (90%+): For cleaning flux residue off the PCB.
- Cotton Swabs or PCB Cleaning Brushes: For applying isopropyl alcohol and scrubbing the board.
Materials Needed
- CR2032 Coin Cell Battery Holders: Ensure they are through-hole type, designed for PCB mounting. You'll need one per game.
- New CR2032 Batteries: One for each game you're modding. Always use fresh batteries.
- Rosin Core Solder: Lead-free or leaded solder (e.g., 60/40 tin/lead) with a thin gauge (0.6mm-0.8mm) works best.
- Flux Pen or Paste (Optional but Recommended): Helps solder flow better and creates cleaner joints.
Having these items ready will significantly ease the process. Investing in quality tools, especially a good soldering iron, will pay off in the long run, not just for this project but for any future retro console maintenance or modding you might undertake. Double-check your inventory before you begin to avoid interruptions.
Step-by-Step Guide: Preparing the Cartridge and Removing the Old Battery
With your tools and materials ready, the next phase in the N64 save battery replacement involves carefully opening the game cartridge and safely removing the old, depleted battery. This step requires patience and precision to avoid damaging the PCB or other components. Rushing through this can lead to irreversible damage, so proceed with care.
Always work on a clean, static-free surface. Using an anti-static mat and wrist strap is a good practice, though not strictly necessary for this particular mod if you handle the board by its edges. The goal here is to expose the PCB and then meticulously remove the old power source.
Opening the N64 Cartridge
Using your 3.8mm security bit, carefully unscrew the two screws located on the back of the N64 cartridge. Once loosened, gently separate the two halves of the plastic shell. The PCB is usually held in place by plastic tabs or guides; slide it out carefully. Avoid touching the gold connector pins with your fingers, as oils can degrade conductivity over time.
Locating and Identifying the Battery
On the PCB, you'll typically find a small, coin-shaped battery, often wrapped in yellow or blue plastic, with two metal tabs soldered to the board. This is your target. Note its orientation (positive and negative terminals) before removal. Usually, the positive (+) terminal is marked on the PCB or the battery itself. The CR2032 holder will need to be installed in the same orientation.
Desoldering the Old Battery
This is the most critical part of the removal process. Heat your soldering iron to the appropriate temperature. Apply the tip to one of the solder joints holding the battery tab. Once the solder melts, quickly use your desoldering pump to suction away the molten solder. Repeat for the other joint. If a joint is stubborn, you can add a tiny bit of fresh solder to help it flow better, then desolder again.
- Apply heat for only a few seconds: Prolonged heat can damage the PCB traces.
- Ensure all solder is removed: The holes should be clear for the new holder's pins.
- Avoid prying: Don't force the battery off if solder remains; reapply heat and desolder.
Once both joints are desoldered, the old battery should lift off easily. If it doesn't, check for any remaining solder. Clean the area with isopropyl alcohol and a cotton swab to remove any flux residue or debris, preparing the pads for the new component. A clean board is essential for strong solder joints.
Installing the CR2032 Coin Holder: Soldering Techniques
With the old battery removed and the PCB cleaned, it's time to install the new CR2032 coin holder. This step involves precise soldering to ensure a secure and reliable connection. Proper technique is crucial here to prevent cold solder joints or damage to the board. Take your time and verify each step.
The goal is to create strong mechanical and electrical connections that will last for years. If you're new to soldering, it might be beneficial to practice on a scrap PCB first to get a feel for how solder flows and adheres.
Orienting and Placing the Holder
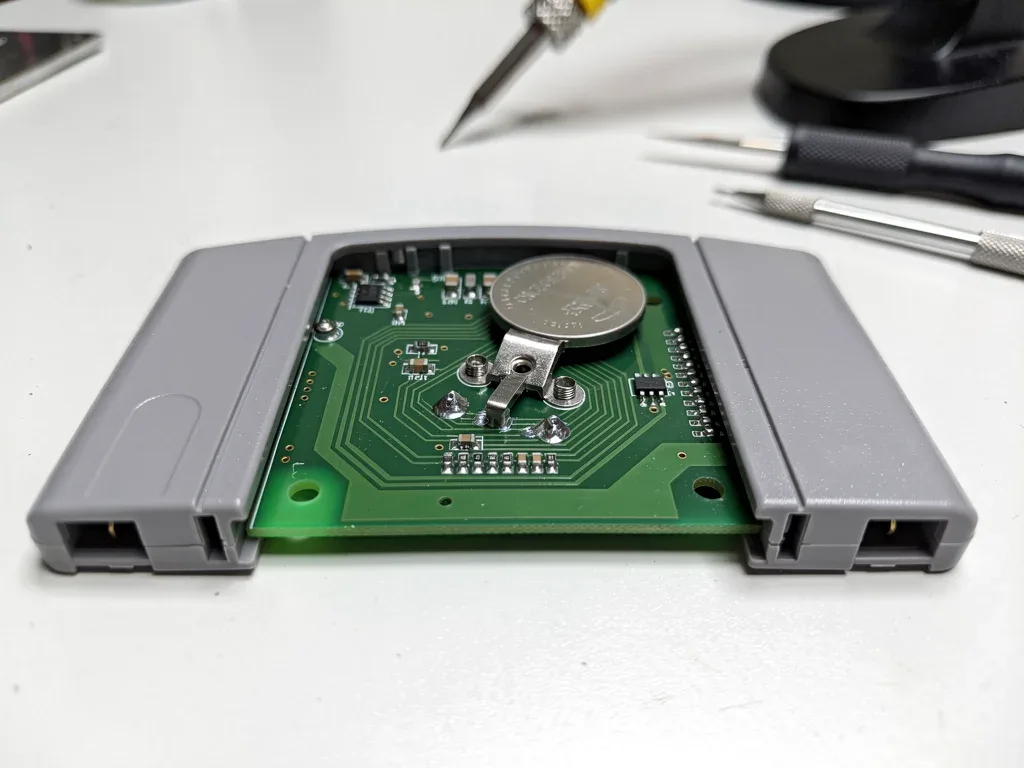
Before soldering, carefully place the CR2032 coin holder onto the PCB. Ensure its polarity matches the original battery's orientation (positive to positive, negative to negative). Most holders are designed with specific pin configurations that fit directly into the existing holes. Gently push the pins through the holes until the holder sits flush against the board.
Soldering the Holder in Place
- Secure one pin: Apply a small amount of solder to one pin of the holder, creating a temporary bond. This allows you to check alignment and adjust if necessary.
- Verify alignment: Ensure the holder is perfectly flat and aligned before soldering the second pin.
- Solder the second pin: Apply heat to the pin and the PCB pad simultaneously, then feed in a small amount of solder until it forms a shiny, volcano-shaped joint.
- Inspect joints: Each solder joint should be shiny, smooth, and concave (like a small volcano). Dull, lumpy, or spherical joints indicate a cold solder joint, which needs to be reheated and reflowed.
After soldering, use your flush cutters to trim any excess lead from the pins on the underside of the board. This prevents short circuits and ensures the PCB fits back into the cartridge shell without issues. A clean trim makes for a professional finish.
Final Cleaning and Testing
Once the holder is securely soldered, clean the area again with isopropyl alcohol to remove any remaining flux. Flux can become corrosive over time and attract dust, potentially causing issues. Insert a fresh CR2032 battery into the newly installed holder, ensuring it clicks into place correctly. Before reassembling the cartridge, it's a good idea to visually inspect all your solder joints and the surrounding PCB for any stray solder bridges or damage. This meticulous approach ensures a successful N64 save battery replacement.

Case Studies: Installing CR2032 Holders on 5 Classic N64 Titles
While the general procedure for N64 save battery replacement is consistent, specific cartridge layouts can present minor differences. Here, we'll look at five iconic N64 titles that utilize battery saves and highlight any particular considerations for each. This practical application will solidify your understanding and build confidence.
These games represent some of the most beloved titles on the platform, making their save preservation a top priority for many retro gamers. The satisfaction of knowing your progress in these classics is secure is immense.
1. The Legend of Zelda: Ocarina of Time
One of the most famous N64 titles, Ocarina of Time uses a battery for save data. The PCB layout is straightforward, with the battery easily accessible once the cartridge is open. Ensure careful desoldering to avoid lifting pads, as this board is often thicker than some others.
2. Super Mario 64
Early revisions of Super Mario 64 use battery-backed SRAM. Later revisions switched to EEPROM, which does not require a battery. It's crucial to verify your specific cartridge revision. If it has a battery, the process is identical to Ocarina of Time, with ample space around the battery for easy access.
3. Mario Kart 64
Mario Kart 64 also utilizes a battery for saving ghost data and high scores. The battery is usually a CR2032. The PCB is generally well-spaced, making desoldering and soldering relatively easy. Pay attention to the orientation of the battery holder, as the space can be a bit tighter near the edge of the board.
4. Star Fox 64 (Lylat Wars)
Another classic that relies on a battery for save files, Star Fox 64's PCB is also quite standard. The battery is usually front and center. The key here, as with all installations, is to ensure the CR2032 holder is flush with the board to allow the cartridge shell to close properly without stress.
5. GoldenEye 007
GoldenEye 007, a revolutionary first-person shooter, uses a battery for saving game progress and multiplayer setup. The battery location is usually clear, and the board provides sufficient room for the modification. This is a highly rewarding game to preserve, given its extensive single-player campaign and memorable multiplayer modes.
For all these titles, the general steps of opening the cartridge, desoldering the old battery, cleaning the pads, and soldering the new CR2032 holder remain the same. Always double-check your work and ensure the new battery is inserted correctly before reassembling and testing the game. The successful N64 save battery replacement on these classics ensures their legacy continues.
Troubleshooting Common Issues and Best Practices
Even with careful preparation, issues can arise during an N64 save battery replacement. Knowing how to troubleshoot common problems and adhering to best practices can save you time, frustration, and potential damage to your valuable games. This section aims to equip you with the knowledge to handle unexpected hiccups and maintain high standards.
Patience is your best friend when dealing with electronics. If something isn't working, take a break, re-evaluate your steps, and then approach the problem systematically.
Common Troubleshooting Scenarios
- Game Not Saving After Replacement:
- Check battery orientation: Ensure the CR2032 battery is inserted correctly (+/-).
- Inspect solder joints: Look for cold solder joints (dull, lumpy) or bridges (solder connecting two points that shouldn't be). Reflow any suspicious joints.
- Verify holder connection: Ensure the holder pins are making good contact with the PCB pads.
- Test the new battery: A faulty new battery is rare but possible. Try another fresh CR2032.
- Cartridge Shell Not Closing:
- Excessive solder: Too much solder can create bumps. Remove excess with desoldering braid.
- Holder not flush: Ensure the CR2032 holder is sitting flat against the PCB.
- Untrimmed leads: Trim any excess lead from the holder's pins on the underside of the board.
- Damaged PCB Pads/Traces: This is more serious. If a pad lifts, you might need to solder a small wire (jumper) from the component lead to the next point in the circuit. This requires advanced soldering skills.
Best Practices for Longevity and Safety
- Use proper soldering temperature: Too cold, and solder won't flow; too hot, and you risk lifting pads.
- Ventilation: Work in a well-ventilated area or use a fume extractor to avoid inhaling solder fumes.
- Cleanliness: Always clean flux residue with isopropyl alcohol after soldering.
- Gentle handling: Handle PCBs by their edges to avoid damaging components or traces.
- Test before reassembly: Always test the game's save function before screwing the cartridge back together.
- Proper storage: Store your N64 games in a cool, dry place to prevent environmental degradation.
By following these guidelines and being prepared for potential issues, your N64 save battery replacement projects will be successful and your beloved game saves will be secured for years to come. This attention to detail is what separates a quick fix from a lasting solution.
| Key Aspect | Brief Description |
|---|---|
| Why Replace? | Original soldered batteries degrade, leading to lost game save data in N64 cartridges. |
| CR2032 Holder Benefit | Allows tool-less, easy battery swaps in the future, extending cartridge lifespan indefinitely. |
| Key Steps | Open cartridge, desolder old battery, clean pads, solder new CR2032 holder, insert battery, test. |
| Tools Needed | 3.8mm security bit, soldering iron, desoldering pump, CR2032 holders, solder, isopropyl alcohol. |
Frequently Asked Questions About N64 Save Battery Replacement
How do I know if my N64 game uses a save battery?▼Most N64 games released early in the console's lifecycle, especially RPGs and games with extensive save files, used batteries. Titles like 'The Legend of Zelda: Ocarina of Time' and 'Super Mario 64' (early versions) are common examples. You can often find lists online or open the cartridge to visually check for a coin cell battery on the PCB.
Is soldering difficult for a beginner?▼Soldering requires some practice, but replacing a battery holder is a relatively simple task for a beginner. It involves only two solder points. It's recommended to watch some tutorial videos and practice on a cheap circuit board first to get comfortable with the technique before working on your valuable N64 games.
What type of battery does an N64 game use?▼Most N64 games that use battery-backed saves utilize a 3V CR2032 lithium coin cell battery. This is why installing a CR2032 coin holder is the preferred upgrade, as it allows for easy replacement of this common and inexpensive battery type when it eventually drains.
Can I just replace the battery without a holder?▼Yes, you can desolder the old battery and solder a new one directly in its place. However, this means you'll have to repeat the desoldering and soldering process every time the battery dies in the future. Installing a holder is a one-time modification that makes future battery swaps tool-less and much simpler.
Will replacing the battery erase my current save?▼Yes, if the battery is already dead or removed, any save data stored on the SRAM will be lost. The purpose of this mod is to prevent future save data loss by ensuring a reliable power source. There's no way to retain a save if the existing battery has failed or is removed without a backup power source.
Conclusion
The journey of preserving your cherished Nintendo 64 game saves is a rewarding one, culminating in the satisfaction of knowing your progress is secure for years to come. By diligently following this guide on N64 save battery replacement and installing CR2032 coin holders, you're not just performing a repair; you're upgrading your retro gaming experience for ultimate longevity and convenience. This essential modification ensures that classic titles like 'Ocarina of Time' and 'Super Mario 64' can be enjoyed and revisited without the dread of losing hard-earned achievements. Embrace the tools, master the technique, and keep the golden era of gaming alive.